This brush bar and its mounting system is intended for an airbag equipped vehicle.
This brush bar MUST be fitted in accordance with these instructions. Failure to do so could affect occupant safety.
FOR WINCH BARS: When fitting the 10,000lb winch, ARB recommends that an Old Man Emu suspension kit be installed to the increased weight and subsequent reduction in ground clearance.
Tools Required
Basic tool kit
Level
Tape measure
Drill
1/2" drill bit
Fitting Procedure
1. Disconnect the headlight washers at the T piece by cutting the tube; take care, as the T piece is fragile. NOTE: First temporarily block the tube to prevent loss of washer fluid.
2. Remove the bumper bar.
3. Remove the headlight washers and tubing from the bumper bar and fit to the bull bar. Make sure the tubing is fed through the holes in the brush bar uprights.
4. Fit the turn signal indicators supplied into the brush bar. NOTE: Refer to the instructions supplied with the turn signal indicator kit.
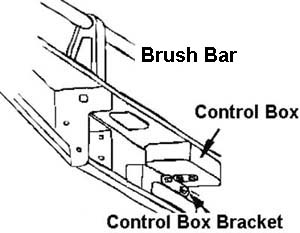
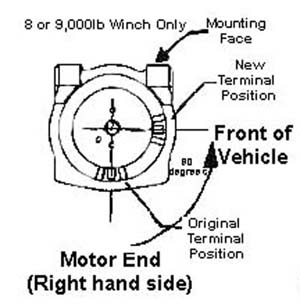
WINCH BARS: FITTING THE 8 OR 9,000lb WINCH
a.) Fit the control box to the control box bracket using the two 1/4" nuts, washers and spring washers. Bolt the control box bracket to the brush by using the M8 x 20mm bolts, flat washers and flange nuts supplied.
b.) To place the winch clutch handle in a convenient location, the winch gearbox must be rotated 2 hole spacings, 72 degrees, in a clockwise direction when viewed from the gearbox end. Place the winch on its end and remove all gearbox bolts. Gently raise the gearbox just enough to rotate it. Do not completely remove the gearbox and avoid damaging the gasket. Refit all bolts and tighten.
Great products and excellent customer service. I always know what I'm getting and when to expect it and can trust it is going to be top quality.
Jeff S. Weldon Spring, MO
7-18-24
Great experience so far with my sales rep! He was able to answer my questions and help put a quote together that was reasonable.
Eric B. Jonesborough, TN
7-18-24
Best selection of the latest Rover merchandise - better than even most dealers…MUCH better than the Land Rover US site. Super quick to pull orders and ship out.
Lance S. Farragut, TN
7-15-24
Every time I have needed anything for my discovery roverparts has been very helpful and knowledgeable to make sure I don’t miss anything I need to accomplish the task at hand.
Bert C. kellogg, ID
7-4-24
You guys are GREAT!
Steve M. Aiken, SC
7-2-24
The website is very easy to use. Your personnel are courteous and helpful. The products are great. ...and the shipping is extremely fast!
Raymond H. Port Orange, FL
6-27-24
Quality products, exactly as described. Bonus points for the personal email with a point of contact in case I had any questions.
John B. Temple, TX
6-18-24
Fast, courteous, knowledgeable and responsive.
James S. Carson City, NV
6-18-24
I always find good information, good parts, the sales person shows always great knowledge about the parts and cars.
Jose R. Lafayette, LA
6-17-24
Awesome customer service!
Randal B. Saskatoon, SK
6-14-24
Reviews from our Customers...
FAST Shipping! Call these Folks they have all the answers to your part installation.
-Bill M. (Boydton,VA)
Great customer service, very knowledgeable staff. Everyone I have worked with are Land Rover owners- which is a big help for knowing the vehicles.
You always have the parts I need at a great price and everyone Ive ever spoken to has a great knowledge of all Land Rovers
-Keith B. (Blue Ridge,VA)
Professionalism. My sales rep is a rock star, and I value both his technical expertise and his knowledge of your product line.
-Alan R. (N. Chelmsford,MA)
You always have the parts I need at a great price and everyone Ive ever spoken to has a great knowledge of all Land Rovers
-Keith B. (Blue Ridge,VA)
Professionalism. My sales rep is a rock star, and I value both his technical expertise and his knowledge of your product line.


 1
1 


