-
Shop Parts
- Shop Accessories
- Shop Overland
-
Shop by Vehicle
![Select Vehicle]() Select Your Vehicle
Select Your Vehicle - Videos & Resources
Sign in to my account
Land Rover Discovery Deluxe Winch Bull Bar Installation Instructions
Applies To:
Item: #9463
Fits: Discovery I | '94 - '99
WARNING: This bar must not be fitted to a vehicle equipped with a supplementary restraint system (Air Bag).
Tools Required
- Basic tool kit
- 1/2" capacity drill
- 1/2" & 6mm drill bits
Note: Refer to winch fitment details before proceeding with procedure.
Remove bumper from vehicle.
The lower steering arm protector must be loosened off at its side pivot points.
Remove plastic skirt from bumper if skirt is going to be refitted to bull bar.
Fit indicators to bar and tighten.
Lay bull bar down so back of bar is facing upwards.
Fit plastic skirt into back of bar and bolt to skirt mounting brackets on bar using 20mm x 8 mm bolts, etc. Finger tighten only.
Hold plastic skirt against bull bar and surround firmly; drill 6mm hole through top of bar using the hole in the bar as a template.
Place 6mm domed head bolts through the bar and 80mm diameter washer under plastic skirt from inside of bar. Fit 6mm flange nuts and tighten firmly.
When plastic skirt is attached to bar, tighten all bolts firmly.
Fit original tow hook to lower section of upright and chassis bracket on passenger side using 10mm hardware.
Lift bar onto chassis and align holes.
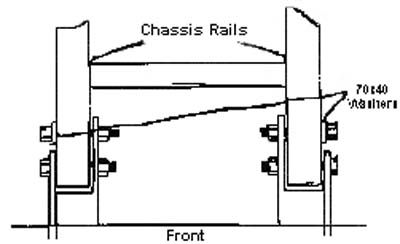
Fit four 4 1/2" x 1/2" bolts, washers, spring washers and nuts in forward chassis holes and 5" x 1" bolts, nuts and spring washers in rear holes. See diagram below for location of special 70mm x 40mm washers.
Tighten steering arm protector and all bull bar fixing bolts.
Fit registration bracket to bull bar using six 20mm bolts, washers, etc.
Fit registration plate to bracket using 6mm bolts, washers, etc.
WINCH & ROLLER FAIRLEAD FITMENT
New mounting holes must be drilled in the roller fairlead to line up with winch mounting holes in bull bar.
Remove circlips, which retain side pins.
Remove side pins and side rollers from roller fairlead.
Position roller fairlead up against roller fairlead bracket.
From rear of bar, using holes in bull bar as guide, mark out new hole positions on roller fairlead and drill out to 1/2".
Position winch on top of a 20-liter or 60-liter drum with the winch mounting holes facing upwards.
Remove winch control box from the winch and replace the winch to the control box cables with the new cables provided.
On the 10,000lbs. winch models, the thermal cut out wire will also need to be extended with cable and insulating green sleeve provided. Do not refit control box to winch.
On 8,000lbs and 9,000lbs winch models, a spacer kit will be required. This spacer kit moves the winch back 8mm to allow installation.
Place the bull bar on top of the winch and align mounting hole. Using bolts supplied from winch kit and 7/16" washers supplied in the ARB kit. Fit and finger tighten the two upper bolts. Place roller fairlead in position over two lower holes and insert bolts. Finger tighten.
Ensure winch and roller fairlead are aligned and tighten all bolts.
Refit winch control box to welded on tag located on bull bar.
Using the 6" bolts supplied, place a flat washer under the head of both bolts and insert bolts through roller fairlead bracket and side rollers. Fit nyloc nuts and tighten so that rollers turn freely.
Fit bull bar to vehicle following previous procedure.
Wire up winch as per winch manual instruction.
Check operation of winch as per winch manual.
UNDER NO CIRCUMSTANCES IS THE WINCH TO BE USED BEFORE THE OWNER'S MANUAL HAS BEEN READ AND UNDERSTOOD. FAILURE TO COMPREHEND THE MANUAL CONTENTS COULD RESULT IN OPERATOR DANGER AND WINCH FAILURE.
What Our Customers Are Saying


