-
Shop Parts
- Shop Accessories
- Shop Overland
-
Shop by Vehicle
![Select Vehicle]() Select Your Vehicle
Select Your Vehicle - Videos & Resources
Sign in to my account
Trailer Wiring Kit Installation Instructions for Land Rover LR4
Applies To:
Item: VPLAT0013ABP
Fits: LR4
We've specially-developed this trailer wiring package for LR4 vehicles. This kit seamlessly converts your Rover wiring plug to either a standard 'Flat 4' North American spec plug or 7-way plug (both connectors included!). Our quality harness kits are dependable and cost a fraction of the genuine versions. They feature a rubber plug cap to protect the exterior trailer plug from the elements and easy plug-and-go installation means they can be installed in minutes.
Parts included in Kit #VPLAT0013ABP:
- 4 ea. M5 x 0.8mm x 40mm machine screws
- 1 ea. YMZ500770ABP harness with trailer connectors
- 1 ea. YMZ500502ABP harness with vehicle connectors
- 5 cable ties
- Instructions
Tools Needed for Kit #VPLAT0013ABP:
- Phillips Head Screwdriver
- 10 mm wrench
Installation Procedure:
1. Remove the left taillight assembly by removing the 2 screws. The tail light will pull off. (See photo #1)

(photo 1)
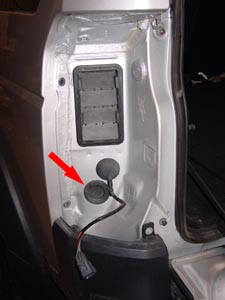
2. Remove the Trailer Connector Access panel. (See photo #2)
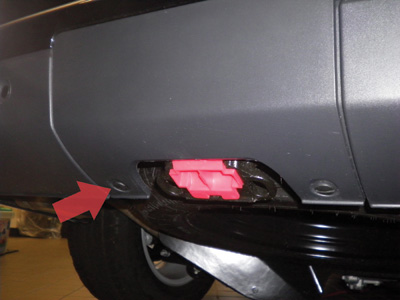
(photo 2)
3. The VPLAT0013ABP Wiring Harness comes in 2 parts. One part with the connectors that plug into the Trailer, and the second part with the connectors that plug into the vehicle.
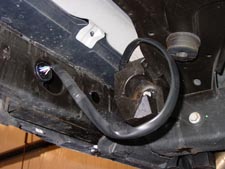
4. Take the part with the trailer connectors and feed the harness through the opening in the bumper (the hole on the left). Maneuver the trailer connector through the opening. (It may take some twisting and turning, but it will fit.)
5. Secure the connector with the 4 screws provided. (See photo # 3.)
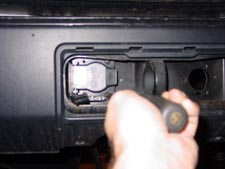
(photo 3)
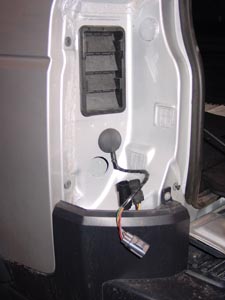
6. Remove the access panel in the left rear of the cargo area of the vehicle and find the 2 gray connectors toward the top of the open area and the round black grommet toward the bottom. (See photo # 4 and photo # 4a.)
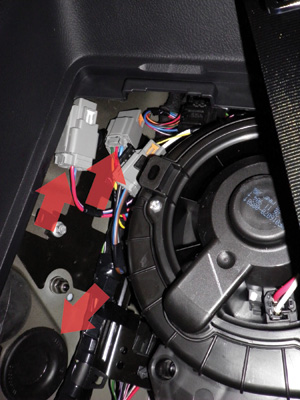
(photo 4)
(photo 4a)
7. The gray connectors are held in place by 2 "dummy" connectors. Pull both of the connectors from their mounting brackets and remove the "dummy" connectors. Remove the rubber grommet as well. (See photo # 5.)
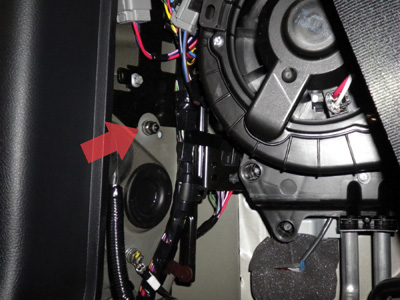
(photo 5)
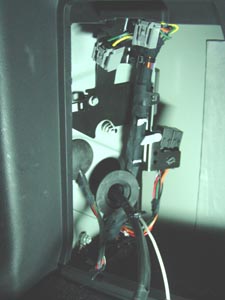
8. Find a second rubber grommet behind the tail light assembly and remove it. (See photo # 6.)
(photo 6)
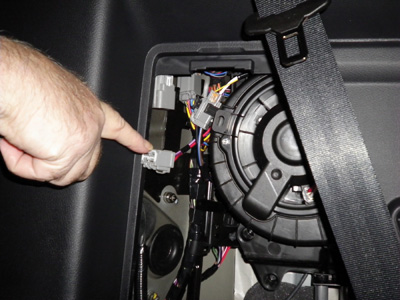
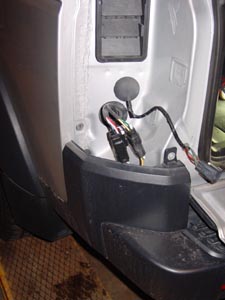
9. Feed the wiring harness with the vehicle connectors through the 2 holes in the vehicle, making sure that the gray connectors that will plug into the car are facing toward the inside. (See photo # 7.)
(photo 7)
10. Once the cable is all the way through both of the holes in the vehicle, push the grommets into place.
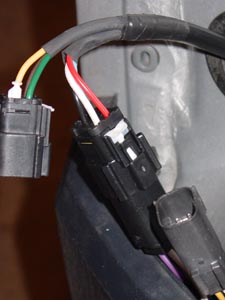
11. Plug the 2 gray connectors of the trailer wiring harness into the gray plugs of the vehicle harness and snap into place on the brackets.
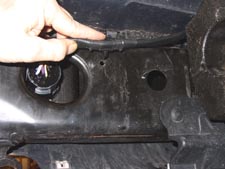
12. Remove the nut from the grounding stud (10mm) and secure the ring lug of the trailer wiring harness to this stud. Secure the harness to the vehicle with the fir-tree cable tie on the harness.
13. Remove the spare tire, so you have room to run the cable underneath the car.
14. Run the cable along the opening underneath the car directly behind the bumper and maneuver the end with the connector such that it comes out in the opening where you removed the tail light assembly. (See photo # 8.)
(photo 8)
15. Once you can see the connectors in the area behind the tail light (See photo # 9), connect them to the harness that you fed from inside the vehicle. (See photo # 10.)
(photo 9)
(photo 10)
16. Make sure that the connectors are completely seated (you should hear a snap when the connectors are fully engaged). Push the white plastic locking tabs forward to secure the connectors. (See photo # 11.)
(photo 11)
17. Wrap these connectors with the foam provided so they will not rattle around in the area below the tail light assembly.
18. Secure the trailer connector end of the harness under the vehicle with the fir-tree cable tie as seen in photo # 12.
(photo 12)
19. Test the installation.
20. Reinstall the spare tire, tail light assembly, trailer access panel and the access panel in the left rear of the cargo area of the vehicle.
What Our Customers Are Saying


