-
Shop Parts
- Shop Accessories
- Shop Overland
-
Shop by Vehicle
![Select Vehicle]() Select Your Vehicle
Select Your Vehicle - Videos & Resources
Sign in to my account
Front Drive Shaft Coupling - Replacement Upgrade
Applies To:
Item: 8880
Fits: Range Rover 4.4 (BMW Engine - L322 / MKIII) | '03 - '05
Parts included in Kit# 8880:
- 1-Hardened Steel Shaft Coupler
- 6-Lock Nuts
- 1-1.5 oz. Tube PTFE grease
- 1-2 inch O-Ring
- 1-Inner Dust Shield
- 1-Dust Shield Removal Tool
- 1-Dust Shield Installation Tool
- Instructions
Tools needed for kit:
- 18 mm Wrenches and Sockets
- Impact driver with a 30mm deep socket
- Soft Mallet
- Gear Puller (5-1/2" reach)
- Torque Wrench capable of 100 ft. lbs.
- Thread Lock (such as LocTite 242)
If necessary:
- Electric Drill
- 5mm Drill Bit (sharp)
I. Removal of Front Drive Shaft:
A. If you are reusing your drive shaft, scribe reference marks so you can install the drive shaft back to its original position.
NOTE: Atlantic British recommends that you replace the drive shaft--part# TVB500290--since damage to the teeth of the shaft coupler can cause damage to the teeth of the drive shaft.
B. Using 18mm wrenches remove the six bolts securing the drive shaft to the transfer box output flange. Slide drive shaft forward and remove coupling and centering flange, then slide the drive shaft rearward and remove it from the coupling tube.
NOTE: You may have to jack the axles up so you can rotate the drive shaft to access the six bolts securing the drive shaft to the output flange of the transfer box.
II. Removal of Shaft Coupler:
A. Using your impact driver with a 30mm deep socket, remove the nut securing the shaft coupler. (See Figure #1 below.)
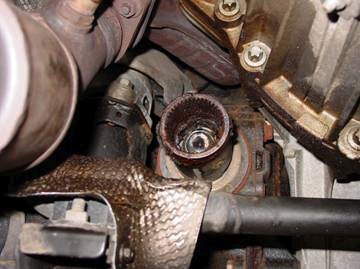
Figure 1.
B. Using a puller remove the coupling tube. (See Figure # 2 below.)
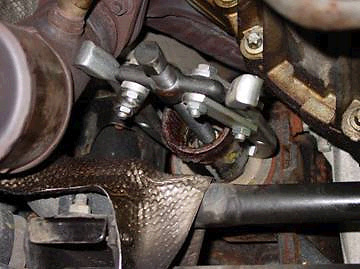
Figure 2.
C. Using the cardboard tube provided in the kit, carefully remove the dust covers from the end of the coupler.
NOTE: You will be reusing the larger of the 2 covers. (See Figures # 3 & 4 below.)
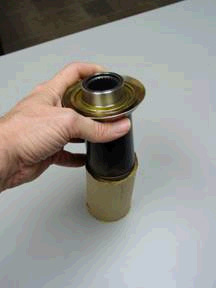
Figure 3.
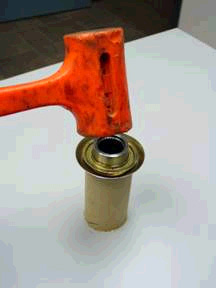
Figure 4.
III. Installing the new Shaft Coupler (Atlantic British Kit# 8880):
A. Install the large dust cover you removed in step II.C above using the PVC pipe to tap the cover in place, and install the new smaller dust cover in the same manner. Be careful to install with the "cupped" area of the covers toward the differential end of the shaft coupler. (See Figure # 5 below.)
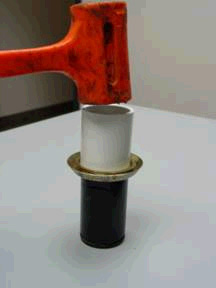
Figure 5.
B. Clean the spines and install the new coupler, putting a drop of thread lock (such as LocTite # 242) onto the shaft threads from the diff. Install the nut and torque to 90 ft.-lbs.
C. Install the supplied "O" ring to the coupling and lubricate with some of the supplied PTFE grease. Thoroughly lubricate the splines on the coupling and the splines on the drive shaft with supplied grease.
IV. Installing the Drive Shaft:
NOTE: Before installing the drive shaft, differential to transfer box front output flange alignment should be checked to ensure the drive shaft is centered on the transfer box flange when you install it.
A. Temporarily install the drive shaft with the centering pin in place. Do not install rubber coupler or bolts.
B. Pull shaft toward the transfer box until it is close to the transfer box output flange. Move the shaft up and down noting the deflection in each direction in relation to the centering hole.
C. Measure the deflection in each direction. The center of that figure has to be within 1mm of the center of the output flange.
D. To correct this loosen the bolt securing the differential. Move the differential up or down until you get the drive shaft centered on the output flange. Tighten the bolts to 81 ft.-lbs torque.
E. Install the drive shaft into the coupling tube.
NOTE: If the drive shaft will not slide in easily (Air gets trapped inside the coupling), the drive shaft center will need to be drilled to let the air escape. To drill, you will need a 5mm (13/64") high quality drill bit properly sharpened. To prevent metal chips from lodging in the drive shaft spline cup, cover the end completely in masking tape before drilling. Care must be taken to prevent the drill bit from breaking. You will need to drill in approximately 2.5". Make sure you clean all the chips.
F. Install the rubber coupling with the arrows facing the transfer box flange and the centering flange. Install the six retaining bolts with new nuts. Tighten to 81 ft.-lbs.
What Our Customers Are Saying


